
I've mentioned a few times how many baby showers I have coming up. This weekend they are officially starting. I have one on Saturday and one on Sunday.
Purchasing gifts for all these showers in such a short time can get expensive (especially when I'm getting ready for my own baby!). So I decided to make something to go along with store-bought gifts, to make my money go a little farther. I settled on ribbon tie baby blankets. What a fun little project! And I hear babies love them, with all the colors and textures.
Let me warn you that I am not a seamstress by any stretch of the imagination. I have a basic skills with a very basic sewing machine. (I've never even used a pattern before.) I took a few wrong turns with this project, but I finally figured out a method that works well and doesn't take too long. Thought I'd share it with you!
1. Cut the front and back panels of fabric. (I did 13 inches x 13 inches) I used a soft material (which I'll refer to as the back) and a regular cotton (which I'll refer to as the front).

2. Use an iron to crease the edges of the front fabric.

3. Pin loops of ribbon around the outside of the front fabric. Place the pin near the base of the ribbon loop.

I used 16 total ribbon loops, or 4 on each side. Use a variety of colors, textures, and patterns.

4. Sew each ribbon loop to the front panel.

Sew the outside edge first. Then remove the pin.

Continue sewing around the base of the ribbon loop to anchor it. Lift the "foot" at each corner and swivel the fabric around the needle until you have sewn a complete square.
5. Repeat until all 16 ribbon loops have been sewn to the front panel.

6. Place the front and back panel together. The back panel will be slightly larger, which is what you want.

Pin them in place with a few pins.

7. Switch your sewing machine to a zig-zag stitch. Stitch the front and back panels together. Try to get the stitch at the very edge of the front panel.

8. When the panels are sewn together, cut the extra fabric from the back panel as close to the front panel as possible.

Ta-da!
Here's the finished product from the front and back:
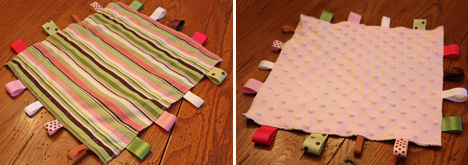
And I made a second one, since I have two showers to attend this weekend:

I love the way they turned out with all the different ribbons! So many fun color combos you can use. I have plans to make many more in the next month or so... :)
***
And...we have a winner of last week's giveaway!
I'm happy to inform Bethany Freitag that she has won a $25 credit to Sweet'n Treats! Congratulations Bethany! And thank you to everyone who entered!
No comments:
Post a Comment